
How to Keep Your Boat From Sinking
A Simple Self-survey Can Prevent Big Trouble
by Dave Pascoe, Marine Surveyor
Tens of thousands of boats of all types and sizes sink every year, most of them at their dock. The exact number is not known because there is no agency that keeps statistics. But just ask any marine insurance company and they will tell you that the number is far too high. In fact, sinking is the number one cause of major marine losses, and one of the primary reasons why marine insurance costs so much.
Introduction
This is a subject that most boat owners would probably dismiss as unimportant. After all, you may reason, boats don't sink very often and that's usually because some fool didn't maintain his. If you tend to think this way, I suggest that you read a little further. Remember that if your boat sinks, you are going to encounter some major headaches, whether its insured or not. The loss of personal effects and fuel or oil pollution fines are additional losses which may not be covered by your policy.
Why do boats sink? It's true that a large number of boats sink
because people neglect them and allow them to sink, either through sheer
ignorance, or through no fault of their own. But the primary reason boats sink
is due to poor design and the use of inferior materials. In this essay I'll
show you how you can perform a simple self-survey that will assure you that
your boat is not likely to sink anytime soon.
First, let's deal with bad design. A nationwide survey of the boat building
industry has shown that 64% of all builders do not have a trained designer on
staff. That means that a lot of boats are designed by people with less than
professional expertise. Another factor is that style has taken precedence over
function and practicality, often resulting in boats that are doomed to sink
themselves.
The sort of bad design that results in boats sinking breaks down into two
categories, basic hull design and internal systems. We'll deal with hull
design first.
Hull Design
problems usually involve boats under 40 feet and more often
boats under 30 feet. Obviously, the smaller the boat, the more prone to
sinking it is simply because it can sink so much faster. The most common
reason power boats sink is due to improperly designed cockpits. In order to
keep people from falling overboard, it is necessary that the gunwale be of a
certain height. If it does not come up above the knees of the average sized
person, then a person is more likely to fall overboard.
In smaller boats such as runabouts and sport fishermen this creates a design
problem because the cockpit deck then often has to be placed very close to the
water line to achieve this height. On the other hand, builders like to make
the cockpits "self-bailing" to allow rain water or waves over the stern to
drain off. Therefore, they add drain scuppers in the transom. Unfortunately,
water can travel in both directions and the water that runs out can also run
in, even with flappers in place. And if the cockpit deck is very close to the
water line - say a few inches - then any change in trim of the boat can result
in the cockpit deck flooding. You may be saying to yourself that the cockpit
deck is water tight, but I'll deal with that subject in moment.
The problem here is that people often underestimate how little additional
weight it takes to substantially change the trim of a small boat, particularly
when placed at the stern to one side. A hundred gallon fuel tank can hold 700
lbs. of fuel and can easily change the trim of a 24' boat by at least two
inches. If the tank is toward the stern, as it usually is, the change can be
even more. Thus, a boat with scuppers as much as 4" above the water line can
easily end up with the deck dangerously close to the waterline. Then consider
what happens if the bilge pump fails, it rains hard or the boat leaks a
little. With most of the weight aft, all the water runs aft and it won't be
long before water is coming in through the scuppers and flooding the deck.
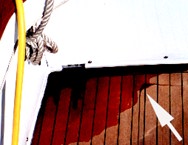
I caught this boat in the process of sinking. The white arrow shows where the water is running into the hatch opening. In this case the scupper is only one inch above the water line. The owner rejected my recommendation to close off the scuppers and three months later it sank.
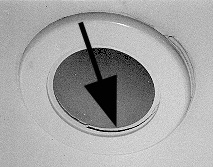
Now consider whether the cockpit deck is really water tight, despite those
plastic hatch covers with the little gaskets on the underside (this refers
primarily to rectangular hatches and not the round type with screw-on covers
which are much better at sealing because they are small). I have conducted my
own experiments on whether plastic hatches are watertight. The results proved
overwhelmingly that not only are they not watertight, but often can allow
large amounts of water to leak through the supposedly gasket-sealed cover.
This happens simply because the hatch covers and frames are thin, flimsy
plastic that can easily distort, resulting in the gasket not sealing at all.
To make matters worse, dirt and debris falls down into the gap and gets under
the gasket when the hatch is opened and replaced without first being cleaned.
When this happens, that gasket is only sealing to a layer of dirt which then
lets water run through. To make matters worse still, those hatch covers are
likely to be located close to the stern for access to bilge pumps, rudders and
the like. Under these circumstances, it's not difficult to understand why so
many of this type of boat sinks.
To check if your cockpit scuppers are safe, first measure the height above the
normal water line with tanks full. Substranct 2" if they're near empty. If the
height above water is less than 4" you've got a problem. Get three 150 lb.
persons to stand in one aft corner. Does the cockpit begin to flood with
water? If so, your boat is in danger of sinking and you should consider
sealing up the scuppers and improving the bilge pump capacity if necessary.
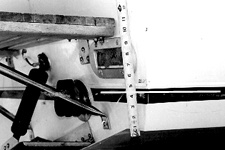
This boat sank three times before anyone found out what the problem was. The scupper is 2.5" above the normal water line which is shown by the white line on the boot stripe.
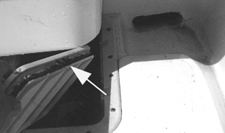
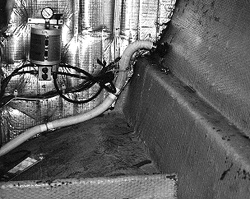
The inside view of the scupper showing that it is only two inches away from a deck hatch. The owner thought it was water tight but tests showed that it leaked as much as 12 gallons per hour. The gasket - as shown by arrow - was jammed with dirt. But even when cleaned it still leaked.
Solving the Leaky Hatch Problem
Leaking plastic hatch problems can be fairly easily be solved by simply
replacing it with a piece of Lexan (not plexiglas) plastic, bedded and screwd
to the deck in place of the plastic hatch. Yes, it will make access to the
pump a bit more difficult. With an electric screw driver, it can be opened up
in less than a minute, by hand a little longer. Use 3/8" thick material for
large openings and bevel the edges sharply so you don't trip on it, and make
the seal with silicone - one of the few good uses of this material on a boat.
Don't use 5200 or polysulphide as you won't be able to get the cover off. The
screw heads should be counter sunk; the screws need to be the stubby, coarse
thread type so that they'll have good holding power.
If you give them the finished dimensions, most plastics sellers (the specialty
shops) or boat yard can machine the plastic for you.The advantage here is not
only will you end up with a water-tight deck or motor well, but you'll also be
able to see into the bilge without opening a hatch. It may be less pretty, but
what's uglier than a sunk boat?
Open Transoms
or boats with no transoms have been appearing on the market with more
frequency lately, and many of these are just accidents waiting to happen. A
boat without a transom cannot reasonably be called seaworthy unless the
internal floatation parts of the hull are made absolutely watertight. This is
almost never the case because the builders never put absolutely watertight
hatches in the decks.
They make a mistake by ignoring the probability that at some point in time the
vessel will encounter circumstances where waves are crashing over the
nonexistent transom, flooding the deck, and thereby endangering the vessel and
its passengers. Builders of such boats don't have the foresight (which they
should have) to consider what would happen if such a boat lost power while
navigating a dangerous inlet, or breaks down while at sea. Under these
circumstances, the lack of a transom becomes very dangerous. Even large sport
fishermen with large, open cockpit scuppers or non-sealing transom doors have
gotten into trouble under such conditions. If you are the owner of such a
boat, you had better think carefully how you use it.
By far, improper design or use of poor quality materials is the cause of the vast majority of boat sinkings. Internal system failures fall into three main categories:
- Reverse siphoning resulting from errors in plumbing design.
- Insufficient bilge pumping or battery capacity.
- Failures in wiring systems.
- Failed through hull fittings and hoses.
Most prevalent of this type are the installation of a bilge pump or shower sump pump with a through hull outlet located close to the water line and without any riser in the discharge hose at all. Again, because of changes in trim, or wave action against the hull, water flows back into the hull through these openings. Despite hundreds of years of design knowledge about this problem, many builders continue to make these same mistakes every year. All discharge outlets close to the water line must have a riser in the discharge hose. 18" is the recommended height, but in no case should be less than 12". If your boat has less than this, it's a fairly simple matter to increase the hose length and extend the riser loop a little higher. All shower sumps and bilge pump discharge outlets should be checked for adequate riser height.
it's hard to imagine how a builder of a $100,000 boat can
justify the use of twenty dollars worth of plastic through hull fittings, but
they usually do. Every year I catch 30-40 boats with broken plastic fittings
that are in danger of sinking them. The first generation of these cheap
fittings were totally vulnerable to degradation by ultraviolet light
(sunlight). This first generation often failed within just a couple years.
Once this became widely known, a second generation of plastic fittings
appeared that would last considerably longer. Unfortunately, they don't last
long enough. A third generation so far seems to be fairly resistant.
Unfortunately, the manufacturer don't put their names on the fittings so I
can't tell you who makes them.
This plastic fitting was not a year old when it cracked. It was poorly designed and could not withstand the weight of a large hose attached to the nipple behind.
In any case, all three grades are in existence and continue to be used. Since these little devils are usually located near the water line, they need to be checked annually when your boat is hauled. Typically, they crack and break off behind the outer flange, so don't trust just looking at them. To test for strength, insert a screwdriver blade in the hole and, with moderate pressure, pry in several directions. If it breaks off then you know what you have to do. And if one is bad, you may as well figure that all of them will break soon and replace them all.
Also watch out for the use of ribbed, thin-wall plastic hose. This material is subject to breakage, particularly when a there is an unsupported length attached to the thru-hull nipple that can bounce around when the boat is underway. The material usually fatigues at the point where it mates to the nipple. The way to test is to pull and twist the hose to see if it cracks or breaks.
Insufficient Bilge Pump Capacity
Far too many power boats 35' and under have both too few bilge pumps and inadequate battery power to run them. And for some strange reason, sail boat builders and owners tend to think that only one bilge pump is necessary, no matter how large the yacht is. In fact, the vast majority of 40' sailboats have only one bilge pump. If you think that's enough, consider the next point.
When bilge pumps fail, most people blame the pump. On the contrary, analysis of hundreds of insurance claims shows that when boats sink, the pump usually failed for some other reason before the boat sank. Here's why:
- Due to dirty bilges, float switch sticks in up or ON position, burns up pump or wears down battery.
- Wire splices to pump and float switch too low in bilge, or get wet from other water sources such as leaking deck hatches, causing corrosion to the wire and resultant failure of the pump. Bear in mind that corroded connections can cause high resistance in the wire that can cause the pump to fail.
Make sure that you have adequate battery power and pumping capacity. For
every two pumps, there should be one back up because pumps are notoriously
unreliable. That's why in no way could one pump every be considered
acceptable.
Be sure that wire splices are as high up as possible and that they don't get
wet from other sources. Remember that bilge water bounces around while
underway. Coating connections with silicone sealer won't help. If the area
routinely gets wet, install a gasketed plastic junction box. Good ones are
available even at Home Depot! Carlon makes a nice one that sells for $5.
Make sure that the pump discharges have adequate risers. But remember,
especially sail boat owners, that too much riser greatly affects the pump's
capacity. A pump located three feet below the waterline, with a 24" riser
(sailboats need this much) will have its pumping ability reduced by more than
50%. For that reason, sailing yachts need higher capacity pumps. The average
Rule 1500 usually just won't do. Go to a 3500.
A bilge pump discharge hose that is lacking a riser loop, installed this way by the builder. Only 3" above the water line, it sank the boat.
Keep bilges clean, especially free of things like rags, paper and string.
This stuff is deadly around float switches. Make sure the wires aren't
tangling up in the switch.
For power boats, remember that bilge water rushes forward and back while
underway. This rush of water can damage float switches. For the stern pump,
place the switch with the float facing aft so that the rushing water won't
catch the flapper and tear it off. Use the covered type switch in the center
bilge at forward areas.
If you've got a 30 footer or larger and are running only a pair of 60 A.H.
car batteries, you don't have enough power for your pumps. This is mainly a
problem for gas powered boats since diesel power is always accompanied by
large batteries.
I rate batteries by taking their total ampere hour (A.H.) capacity when new
and dividing that in half. Batteries age quickly and this is really about all
you can expect. As near as I can tell, amperage ratings of pumps seems to be
for pumping water sideways, not for pumping with three feet of static head.
I've measured 6 amp pumps pulling 12 amps under load. So how long can you
expect a pump to run under load on an aging 60 A.H. battery? A couple hours at
best, probably a lot less. At mininum you should be running a pair of 90 A.H.
true marine batteries in parallel. Pumps should be set up to run off the ALL
batteries on your master switch setting, never just one. For that reason,
pumps should never be wired to a battery direct as it will only have the
benefit of one battery power. See related article, Solving Chronic Battery Problems.
Remember that all aspects of your system must be maintained for it to work
properly. Don't ignore it for two years and expect it to keep functioning.
Your pumping system should be thoroughly checked out annually.
Far too many boats are wired so that shutting off the main power, either the main breaker, or the battery switches, shuts off the bilge pumps. it's truly amazing how many builders of expensive yachts make this amateur mistake. That means that if you shut off the power when you leave the boat (even when you've left pump switches on) you inadvertently turned off your pumps. Testing for this is simple: just shut off the main DC breaker and turn the battery switches to OFF, then lift the float switch and see if the pump works. If not then it's wired wrong.
owners should be especially alert to the following dangers:
- Motor wells are intended to keep water out of the hull. If the well is full of holes, it won't achieve that purpose. Watch out for inspection ports located at the bottom of the well that will leak and possibly sink the boat. Make sure that the gasket is in good condition and the mating surface is clean. Ideally, these things should not be there. Replace the with Lexan covers as described above.
- Openings for control cables and steering within the motor well should be located above the level of the transom cut down for motor mounting. If the openings are below this, they must be sealed and relocated higher up. A motor well should be absolutely water tight.
- Control cable boots: don't think that these things will keep water out of the hull. They don't. If the opening is down in the well, you must relocate it or risk sinking.
- If cockpit scuppers threaten to sink the boat, close them up. Better to rely on the bilge pumps than to run this risk.
The vast majority of sailboats have one small bilge pump located in the keel sump, often under an engine and usually where it cannot be reached for servicing or testing. Battery power is usually not a problem, but pump failure is. The small pump for normal dewatering is fine, but I recommend that every boat should have a large back up pump of at least a Rule 3500. This pump should be located near the top of the keel sump so that it activates in the event the primary pump failures. In this case it would be an emergency and the larger pump would be better able to handle it.
The use of check valves can be very helpful in preventing reverse siphoning. But only if you know what you're doing. Improperly installed valves can make the problem worse, rather than better. Heavy bronze valves should never be used with low voltage pumps because the high pressure required to activate the valve only serves to reduce the pump's capacity. If you need to install a check valve - as is often useful when a very high riser is involved - I recommend that the plastic type manufactured by Rule Industries be used. That's because it takes very little pressure to open and close it, and it won't seriously retard pumping capacity.
First posted on April 19, 1997at David Pascoe's site www.yachtsurvey.com.
Page design changed for this site.

Over 180
Online Articles by David Pascoe

Power Boat Books
 Mid Size Power Boats
 A Guide for Discriminating Buyers
Focuses exclusively cruiser class generally 30-55 feet
With discussions on the pros and cons of each type: Expresses, trawlers, motor yachts, multi purpose types, sportfishermen and sedan cruisers.

Selecting and Evaluating New and Used Boats
Dedicated for offshore outboard boats
A hard and realistic look at the marine market place and delves into issues of boat quality and durability that most other marine writers are unwilling to touch.

2nd Edition
The Art of Pre-Purchase Survey The very first of its kind, this book provides the essentials that every novice needs to know, as well as a wealth of esoteric details.

Pleasure crafts investigations to court testimony The first and only book of its kind on the subject of investigating pleasure craft casualties and other issues.