
Maintaining Stern Drives
by David Pascoe, Marine Surveyor
Anyone who has owned a stern drive boat or two knows how troublesome and costly stern drives can be. A typical drive replacement runs $2,500 or more, and with a twin engine boat you've got more than $5,000 worth of machinery hanging off the back of the boat. Take a tour of a few boat yards and you are likely to see dozens of boats with their drives removed, many because they are corrosion damaged. This fact alone makes proper maintenance well worth the effort.
Most corrosion damage occurs because owners do not know how to maintain these cantankerous machines. And because of the complex shape of the drives, proper maintenance is not easy. In order to understand how to maintain a stern drive unit with a minimum of trouble, you need to know something about the origin of these problems.
Aluminum would be the ideal material for marine applications except for one thing. It is anodic to most other metals, including iron, steel and stainless steel to which aluminum is often mated. We are talking here about galvanism, the electrical relationship of one metal to another. Common flashlight batteries generate electricity by means of galvanism by using two different metals that are very far apart in electrical potential. A metal that is cathodic has a low potential, while one that is anodic has a high potential. Bring the two metals together and electricity will be generated. The electrical flow is always from the anode to the cathode. This flow of electrical current then causes electrolysis, but the correct term to use is galvanism.
When electricity flows from the anode to cathode, it will carry small molecules of the metal with it. This is why zinc, used to protect underwater metal parts, slowly erodes over time. The flow of current is carrying molecules of the metal away to the cathode. And since aluminum drives are basically very large anodes, keeping the drive unit from self-destructing is not easy. Zinc's are used because zinc has an even higher electrical potential than aluminum. Thus the zinc is sacrificed to protect the aluminum.
Aluminum plate is a very good material for boat building because plate contains alloys that make the aluminum self-protecting. This is not true of the cast aluminum of which stern drives are made; cast aluminum cannot be achieved in corrosion resistant alloys, and this is what makes maintaining stern drives so difficult. The drives contain different metals, such as iron, steel and stainless steel, which add to the problem.
Aluminum Must be Protected
The only way to protect the drive is to maintain the integrity of the coating. Once the paint is breached and water gets at the metal, it starts corroding. This can occur from hitting objects in the water, but most often the paint is damaged by marine growth such as barnacles which attach themselves with the strongest glue known to mankind. Once the barnacle attaches itself, you cannot get it off short of sanding or scraping. When you do this, of course, you damage the coating, and the corrosion process begins.
Both galvanic action and stray current are primary causes of damage. Galvanism can occur when your zinc's are no longer effective and the drive it self becomes anodic to other metals such as stainless steel or iron engine parts. But more often, the damage occurs as a result of stray current. This is caused by a variety of faults, most often the improper installation of electrical equipment, a failure to maintain the electrical system, or even wiring faults created by the builder. One very common example is when an owner repairs or installs a bilge pump with the wire connections that get wet or come in contact with the bilge water. This can put 12 volts of current straight into the bilge water.
Stray current damage is usually identifiable by rapidly occurring corrosion. This manifests as bubbling and blistering of the paint, along with pronounced white spots, as well as corrosion occurring along angular edges of the various aluminum components. In advanced stages, it appears as pitting. Galvanic corrosion does exactly the same thing, although it usually occurs less rapidly, becoming noticeable over the years, whereas stray current can cause serious damage in a matter of weeks or months.
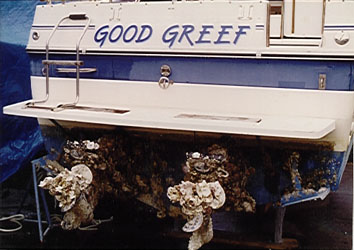
This fellow waited just a bit too long. Imagine what it would take to get these oysters of these drives. At least he got the name of his boat right.
Obviously, it is extremely important in sea water that no marine growth be allowed to occur. As the nearby photo shows, allowing it to get out of control can be disastrous. Since drives do not come with anti fouling coatings, that means that you, the owner, are responsible for this. The biggest problem with anti fouling coatings is that neither owners nor boat yards know much about the proper way to use them. If you ask your local marina to paint your drives, more than likely, they will just slop a coat of paint on without adequate preparation. We see this on countless occasions. The next time you haul the boat, you find that it's all coming off and now you have real mess on your hands.
Why does this happen? Preparing for the application of an anti fouling paint to a drive is very difficult because the drive first has to be sanded. Because of its highly irregular shape, no one wants to take the time to do the job properly because it involves costly labor. And if it's not done properly, the paint will come off, barnacles will grow, the original coating will be damaged, and now the corrosion starts. This is compounded even further if the drive is dirty, even without barnacles. You can't paint over dirt and expect the paint to stay on.
This means that the drives have to be painstakingly sanded and primed before the anti fouling is applied. Yep, all those darn nooks and crannies that are nearly impossible to reach. And how the heck do you do that up inside where the bellows and other hoses are? Can't be done, can it? Herein lies the real weaknesses of the stern drive.
The key to good stern drive maintenance begins at day one with a properly applied anti fouling. Attempting to accomplish this after the drives are a few years old, the paint damaged and all dirtied up is bound to lead to failure unless you are willing to completely remove, dismantle and clean all components. That's a job almost no one is willing to undertake. For the worst of the corrosion damage is going to occur in all those places that are most difficult to reach. So we see then, that the demise of most stern drives is the accumulation of inadequate maintenance.
We hear it said over and over that the key to successful painting is preparation. If the paint is going to stay on and provide protection, it must be done right. The job is easiest when the drives are fairly new, before any corrosion damage has occurred. First, thoroughly clean the drives with a cleanser and brush. Collect a variety of old toothbrushes, dish cleaning and bottle brushes to do the job. If the dirt is particularly stubborn, use an abrasive kitchen cleanser. That will get it off fast and do a little sanding too. Use your selection of brushes to get at all the crannies and do a good job.
Whether you have new, clean drives, or old, dirty ones, both need to be thoroughly sanded. The best way to do this is to remove them, separating the upper and lower units for ease of handling. Many folks try a rotary wire brush for ease of getting at the crevices. Beware that steel brushes leave traces of steel on the metal that will defeat your paint job. DO NOT USE WIRE BRUSHES! Only sandpaper can be used with a grit no greater than 150. I recommend that you NOT use a machine, because you must be very careful not to go through the finish, only to abrade the surface. Be especially careful on the sharp edges -- just barely touch them with the paper. All those nooks and crannies must be done by hand. But remember, the better job you do, the longer it is going to last.
Select a paint specially formulated for stern drives. Or, you can go to the U.S. Paint or International Paint web site and check their coal tar epoxy paints. Coal tar epoxy is an extremely good coating for aluminum. This is because the material never completely hardens, but remains slightly soft so that it will not chip or come off easily. It is more difficult to use, but it is definitely worth the effort. Whatever you use, make sure that you follow the manufacturer's instructions precisely. No, nobody wants to read all that small print on the can, but if you don't you'll just be wasting your time.
The coal tar epoxy is a base coating that you will apply the anti fouling over. Once you get the coal tar on, you can slop the anti fouling on and it won't matter because the coal tar will provide tremendous protection to the metal. Plus, barnacles don't stick to it very well, so even if you get them, they won't do any serious damage. You can scrape them without going through this tough coating.
If your drives already have damage to the paint, or have marine growth such as barnacles, you are in a tough spot. At this point, the damage is already beginning and the object should be to stop it. Barnacle heads have to be removed by sanding, and a small angular head rotary sander is the tool for the job. Don't try this with sanding disk attached an electric drill, or a regular sander. Removal of the heads must be precisely done, damaging as little of the undamaged paint as possible.
If the paint is already damaged, but not extensively, the thing to do is use a medium grit such as 150 and sand all corroded areas down to bare metal. If there are pits, use something like a Dremmel tool with rounded grinding bit to remove the corrosion by products from the craters. If you don't do this, you efforts will fail. It is imperative that all corrosion oxides be removed.
If you purchase a complete painting kit -- and we recommend that you do this -- it will contain a pre primer wash. This is a chemical that will remove aluminum oxides that you cannot see, but develop immediately after the metal is exposed to air. You must apply your aluminum primer immediately after this is done, as the aluminum will develop more corrosion just from moisture in the atmosphere. You won't be able to see that, in the way raw steel rusts, but it will be there and will defeat your efforts.
Once the drives are painted, you should not leave them raised after docking. Keep them submerged because prolonged exposure to air dissipates the anti fouling properties of the paint. it's okay to keep the boat out of the water for a day or two for trailering, but generally you should keep the boat afloat with the drives completely submerged.
Check the drives periodically for mossy growth. When you see this, use only a moderately soft brush to clean them. Do not use very stiff bristle brushes. Once you see hard growth like barnacles starting, you must pull the boat immediately and reapply anti fouling. Use the procedure for basic cleaning with cleanser described above.
Once the zinc's become heavily corroded on the exterior, the build up of oxides insulate the metal and render the zinc ineffective. When the zinc is oxidized, but not heavily wasted, you can wire brush or scrape the oxides off down to bright metal without replacing them. Try to do this as soon as they begin to look corroded. When 30% of the material is gone, it's time to replace them.
If your zinc's are eroding very rapidly, this is a sign that all is not well. If they disappear in a matter of months, you have a stray current problem that must be located and corrected. But it will also happen that the zinc's will erode just a little bit too fast for comfort, but not fast enough to signal a major problem. Yet this is a major problem, for once the zinc is no longer effective, the drive will then corrode. You can try increasing the size, or adding yet another zinc. But if this does not stop the rapid erosion, you need to search for the cause. Have you added or changed anything that might upset the electrical balance? Any electrical work done recently?
If you have dockside power aboard your boat, you need to find out if it is installed properly, especially if you have a used boat where it was added on later. With shore power, you MUST have an isolation transformer installed in the shore power grounding circuit. If you do not, contact a reputable marine electrician and get one installed. Also be certain that the system is equipped with a polarity indicator. Small boats more often run into polarity problems than larger boats. Improper grounding can be absolutely deadly to stern drives, and that kind of damage will NOT be covered by your insurance.
The paint will usually chip off on the leading edge and bottom of the skeg. This usually does not cause a problem unless you see pitting starting. Otherwise, you don't really need to worry about that. Why not? Because the metal is very thick at these points and corrosion damage is much less critical. However, chips on other parts of the drive should be carefully touched up with your original coating system, much the way you'd handle chips on your auto finish. A little sanding, priming and touch up.
If you see pitting starting, then you need to look to the cause. Are the zinc's still effective? Or do you possibly have a stray current problem?
Checking for Electrical Faults
When you first acquire the boat, it's a good idea to measure its electrical potential in order to establish a base record. With your battery switch and ignition key on, use a multimeter and measure the potential between the stern drive and ground such as a water pipe. It is likely to come in at between ? and ? volts. Record this reading in your boat record.
If a corrosion problem should begin to develop, take another reading. Is it higher than the original? If so, chances are the electrical balance has been upset, either by stray current, the addition of some new piece of equipment, small shorts from wet wiring or something like that. Even batteries sitting on a wet deck can cause problems like this, so it's a good idea to keep a base reading record, for this will make locating the source of the problem much easier.
The drives have four bearings that allow it to rotate. These are steel mated to aluminum and are a real weak spot and must be lubricated with lithium grease regularly. The grease fittings are submerged, so to do this the boat must be pulled. If you fail to do this, the bearings will corrode, wear and the steering will become loose and sloppy. Eventually, the cast aluminum housings will crack and result in costly replacements.
The gear oil should also be checked regularly. it's located just below the round gear housing. Be sure to use a slotted screwdriver that is correctly sized, otherwise you will probably bugger the plug head. Back the plug out until it becomes loose, but don't let it fall out of the hole. Just back it out enough until some oil starts to run out. What you are looking for is the color of the oil. If it comes out all milky looking, e.g. not translucent, you have water in the oil.
Water in the oil is usually the result of wear caused by operating in muddy or sandy water, which causes rapid wear of the seals. Or you could have wrapped fishing line around the shaft. Fishing line spooled around the prop shaft is a very common cause of shaft seal damage. Remove the prop and check for oiliness on the shaft. In any case, you must have the seal replaced.
While you are making your inspection, check the propeller shafts by rotating them. If they are even slightly bent, you will be able to see this at the point where the prop hub meets the gear housing. If it is not rotating perfectly straight, you have a bent shaft that should be replaced immediately.
The Mercruiser drives tend to be more troublesome because of two bellows hoses for the drive shaft and shifting controls. These have to maintain a water tight seal between the lower unit and the inside of the boat. Check these bellows by raising the drive and inspecting them. Look for wear at the point they contact each other or the sides of the drive. Also for signs of cracking and age. It is imperative that no barnacles or oysters be allowed to grow on them as these razor sharp critters can cut through the bellows in no time. Check the clamps for signs of rust and replace them if you see any.
As you can see, maintaining stern drives is problematic, to say the least. If you are going to keep a boat afloat in sea water, especially if it's for more than 6 months per year, you should seriously consider whether this type of drive system is right for you.
First posted on January 31, 1998 at David Pascoe's site: www.yachtsurvey.com.
Page design changed for this site.

Over 180
Online Articles by David Pascoe

Power Boat Books
 Mid Size Power Boats
 A Guide for Discriminating Buyers
Focuses exclusively cruiser class generally 30-55 feet
With discussions on the pros and cons of each type: Expresses, trawlers, motor yachts, multi purpose types, sportfishermen and sedan cruisers.
Selecting and Evaluating New and Used Boats
Dedicated for offshore outboard boats
A hard and realistic look at the marine market place and delves into issues of boat quality and durability that most other marine writers are unwilling to touch.

2nd Edition
The Art of Pre-Purchase Survey The very first of its kind, this book provides the essentials that every novice needs to know, as well as a wealth of esoteric details.

Pleasure crafts investigations to court testimony The first and only book of its kind on the subject of investigating pleasure craft casualties and other issues.